Heterogeneous Data Parallel Computing
Slides for these notes can be found here.
Terms & Concepts
- Task Parallelism vs. Data Parallelism
- kernels
- threads
- grids
- blocks
- global memory
- data transfer
- error checking
- compilation of CUDA programs
Summary
This topic introduces the basics of data parallelism and CUDA programming. The most important concept is that data parallelism is achieved through independent computations on each sample or groups of samples. The basic structure of a CUDA C program consists of writing a kernel that is executed independently on many threads. Memory must be allocated on the GPU device before transferring the data from the host machine (CPU). Upon completion of the kernel, the results need to be transferred back to the host.
CUDA C Programs
A basic CUDA program consists of:
- A kernel function defining the work to be performed on each thread.
- Data that is accessible on the device.
- Device memory allocation.
- Memory transfer from the host to the device.
- Execution of the kernel from the host machine.
- Data transfer from the device back to the host.
- Memory cleanup.
At first glance, the execution flow of a CUDA program appears sequential; you launch the threads on the GPU and wait for it to complete. A more realistic program would launch the threads and continue local execution, if necessary.
Example: Vector Addition
Hwu et al. refer to vector addition as the “Hello World” of GPU programming (NO_ITEM_DATA:hwu_programming_2022). It is a simple problem that can be described as embarrassingly parallel. Vector addition is a simple operation. Given two vectors of the same length, \(\mathbf{x}\) and \(\mathbf{y}\), the vector addition operation is defined as:
\[ \mathbf{z}_i = \mathbf{x}_i + \mathbf{y}_i \quad \forall i \in \{1, \ldots, n\} \]
The vector addition operation is commutative and associative. The operation can be performed in parallel on each element of the vectors. This can be implemented simply in C.
void vecAdd(float *x_h, float *y_h, float *z_h, int n) {
    for (int i = 0; i < n; i++) {
        z_h[i] = x_h[i] + y_h[i];
    }
}
One small note about the variable names: it is common to use the suffix `_h` to denote a variable that is allocated on the host (CPU) and `_d` to denote a variable that is allocated on the device (GPU). In this case, the vector addition operation is performed on the host machine.
An equivalent implementation in CUDA C is shown below.
__global__
void vecAdd(float *x_d, float *y_d, float *z_d, int n) {
    int i = blockIdx.x * blockDim.x + threadIdx.x;
    if (i < n) {
        z_d[i] = x_d[i] + y_d[i];
    }
}
This kernel executes on a single thread. The thread index is computed using built-in variables `blockIdx.x`, `blockDim.x`, and `threadIdx.x`. The details of how these variables are defined are not important right now. The main point is that each kernel is executed on a single thread. For a GPU with thousands of individual threads, this kernel will be executed thousands of times in parallel.
The __global__ keyword placed before the function definition indicates that the function can be called from both the host and the device, but it is only executed on the device. The table below shows the different keywords used to define functions in CUDA C.
| Keyword | Description |
|---|---|
__global__ |
Executed on the device, callable from the host and device |
__device__ |
Executed on the device, callable from the device only |
__host__ |
Executed on the host, callable from the host only |
Unless otherwise specified, functions that you define will be executed on the host. That is, it is not necessary to specify the __host__ keyword. If you want the compiler to generate both host and device code, you can use the __host__ __device__ keyword combination.
The kernel is executed on the host machine using the following code.
int main() {
    // Allocate memory on the host
    float *x_h, *y_h, *z_h;
    int n = 1024;

    x_h = malloc(n * sizeof(float));
    y_h = malloc(n * sizeof(float));
    z_h = malloc(n * sizeof(float));

    // Allocate memory on the device
    float *x_d, *y_d, *z_d;
    cudaMalloc(&x_d, n * sizeof(float));
    cudaMalloc(&y_d, n * sizeof(float));
    cudaMalloc(&z_d, n * sizeof(float));

    // Transfer data from host to device
    cudaMemcpy(x_d, x_h, n * sizeof(float), cudaMemcpyHostToDevice);
    cudaMemcpy(y_d, y_h, n * sizeof(float), cudaMemcpyHostToDevice);

    // Execute kernel
    vecAdd<<<ceil(n / 256.0), 256>>>(x_d, y_d, z_d, n);

    // Transfer data from device to host
    cudaMemcpy(z_h, z_d, n * sizeof(float), cudaMemcpyDeviceToHost);

    // Free memory on host and device
    free(x_h);
    free(y_h);
    free(z_h);
    cudaFree(x_d);
    cudaFree(y_d);
    cudaFree(z_d);
}
There is a lot to unpack here, so we’ll start from the top.
Memory Allocation
It doesn’t really matter where the host data comes from or how it is allocated, but the above example allocates memory using malloc anyway. Before transferring data to the device, we must allocate memory on it. This is done via cudaMalloc. The first argument is a pointer to address of the variable. Remember that taking the address of a pointer will result in a double pointer. This is necessary because the function will need to dereference the pointer to store the address to the allocated data. Once the memory is allocated on the device, it cannot be accessed from the host until it is transferred back.
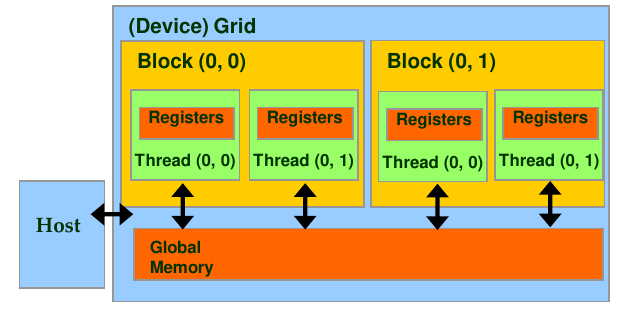
Figure 1: Overview of memory layout (source: NVIDIA DLI).
The memory that is allocated on the device is called global memory. It is accessible by all threads on the device. There is also a small amount of shared memory that is accessible by threads within a single block along with a unified memory model.
Memory Transfer
Now that the memory has been allocated, the data can be safely transferred from the host to the device. This is accomplished using cudaMemcpy. The arguments are the destination pointer, source pointer, size, and direction. The direction is an enumerated type that can be one of the following:
cudaMemcpyHostToDevicecudaMemcpyDeviceToHostcudaMemcpyDeviceToDevice
We will only focus on the first two for now.
Grids, Blocks, and Threads
The CUDA programming model is based on a hierarchy of grids, blocks, and threads. A grid is a collection of blocks. A block is a collection of threads. The number of blocks and threads is defined by the programmer. The number of blocks and threads that can be executed in parallel is limited by the hardware. The number of blocks and threads that can be executed in parallel is called the grid size and block size, respectively.
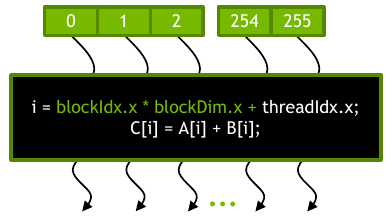
Figure 2: A single block of 256 threads (source: NVIDIA DLI).
The figure above shows a single block of 256 threads. This could be one of many blocks in a grid. The threads within each block are executed in parallel and do not interact with threads in other blocks. For threads within a single block, there is a small amount of shared memory as well as other tools for communication. We will explore these in more depth as we dive into the details of the CUDA architecture.
Kernel Execution
Calling the kernel function almost looks like any ordinary function call. The main difference is the inclusion of the <<< and >>> syntax. These are used to specify the size of the grid and blocks, respectively. In this example, we specified that each block has 256 threads. We can use that specification to dynamically determine the number of blocks based on the input size. The number of blocks is computed as the ceiling of the input size divided by the number of threads per block. This ensures that there are enough blocks to cover the entire input size.
Returning to the kernel function, the thread index is computed using built-in variables blockIdx.x, blockDim.x, and threadIdx.x. These are defined as struct variables. Modern GPUs have a 3-dimensional grid, but we only need to worry about the first dimension for now. The thread index is computed as the product of the block index and the number of threads per block plus the thread index within the block. This is a common pattern for computing the thread index.
You may have noticed that it is possible to have more threads than there are blocks. As much as possible, you should try and work with powers of 2. This will ensure that the hardware is used as efficiently as possible. You can always request more threads than there are data points and ignore the threads that are not needed. In this example, we check to see if the thread index is less than the input size. If it is, the vector addition operation is performed. Otherwise, the function exits.
There are limits to the number of blocks and threads that can be executed in parallel. These limits are based on the compute capability of the device, referenced here.
Compiling
CUDA code is compiled using the NVCC compiler driver. It works by compiling host code using the host’s native C/C++ compiler and device code to PTX, the CUDA instruction set architecture. Each snippet of code is separated based on the CUDA keyword used to define it. For example, the __global__ keyword used to define the kernel function informs nvcc that it should be compiled to a PTX file.
Error Checking
The functions we use in the CUDA API return an error code. We can use this to create robust code that checks for errors and either corrects them or exits gracefully. The following example shows a simple way to check the result of cudaMalloc:
cudaError_t err = cudaMalloc(&x_d, n * sizeof(float));
if (err != cudaSuccess) {
    fprintf(stderr, "Error: %s\n", cudaGetErrorString(err));
    exit(EXIT_FAILURE);
}
A common pattern is to define a macro that checks the result of a CUDA function and exits if there is an error. This is shown below.
#define gpuErrchk(ans) { gpuAssert((ans), __FILE__, __LINE__); }
inline void gpuAssert(cudaError_t code, const char *file, int line, bool abort=true) {
   if (code != cudaSuccess) {
      fprintf(stderr,"GPUassert: %s %s %d\n", cudaGetErrorString(code), file, line);
      if (abort) exit(code);
   }
}
A small note on the above macro, it is technically C++ code. As of writing this, CUDA does not support all features of C++, but much of the code you will see is written as a mix of C and C++. CUDA was originally developed for C, but C++ features have slowly been introduced over time. If you view the official documentation, you can see that the link is defined as `cuda-c-programming-guide`, but the actual document has been renamed to `CUDA C++ Programming Guide`.
Don’t overthink the C/C++ distinction. The main point is that you can use C++ features in your CUDA code, but you should be aware that not all features are supported.